Adapted from the STEP Community Forum by ASF staff

Background

This recipe allows the user to create a Digital Elevation Model (DEM) product from two Sentinel-1 SLC scenes. The user first creates an interferogram, and completes the appropriate phase unwrapping steps, then creates the DEM.

Pair Selection for DEMs

ASF’s baseline tool may be used to select a pair of Sentinel images to create the DEM. The baseline tool can be accessed as a stand-alone tool, or via a Vertex search. The optimum pair for DEM creation would have a large perpendicular baseline and a small temporal baseline.

More details for pair selection

Overlap is required. Pairs must be of the same path number and must cover the same area. Images with different flight directions (ascending vs descending) cannot serve as pairs for interferometry.

Coherence is key. You need to pick a pair that has the least temporal baseline possible. This not only minimizes the coherence loss, it also minimizes any potential ground motion. The longer the time between images the higher the decorrelation.

Baseline cannot be ignored. Interferogram sensitivity to the perpendicular baseline is such that a large baseline improves the InSAR’s sensitivity to height variations. So, from that perspective larger baselines are better than smaller. However, as the baseline increases, the coherence decreases. Image alignment is problematic if the perpendicular baseline between images is greater than about 3/4 of the critical baseline because the images will be baseline decorrelated. The critical baseline for S1A is about 5 KM.

Tradeoffs of DEMs created with Sentinel’s C-Band

On the downside, C-band doesn’t penetrate vegetation. This means that DEMs derived from C-band don’t actually measure the earth’s surface, rather they show the top of the canopy. In contrast, an L-band radar with a long wavelength as found on ALOS, can penetrate vegetation. L-band radar receives a reflected wave from the ground and is coherent even in a forest area. C-band has lower coherence than L-band because of the vegetative decorrelation. These effects make it more difficult to make accurate DEMs from Sentinel-1’s C-band than from ALOS’s L-Band.

On the other hand, Sentinel has excellent temporal coverage, meaning that the temporal decorrelation is lower than with previous sensors. Sentinel should be excellent for creating DEMs of barren land or urban areas. However, beware of DEMs created over vegetated areas, especially in the spring during blooming season.

Prerequisites

Materials List

  1. Sentinel-1 Toolbox (v6.0.0)
  2. Statistical-cost, Network-flow, Algorithm for Phase Unwrapping (SNAPHU) (v1.4.2)
  3. ASF’s How to Create an Interferogram Using ESA’s Sentinel-1 Toolbox data recipe
  4. ASF’s How to Phase Unwrap an Interferogram data recipe
  5. Linux —
  6. Sample granules
 

Steps

Follow steps below from the Create an Interferogram Using ESA’s Sentinel-1 Toolbox data recipe. 

Notice that the Visualize Interferometric Phase — Topographic Phase Removal and Multi-looking and Phase Filtering — Multi-looking steps are deliberately omitted.

  • Opening Data in Sentinel-1 Toolbox — Open the Products
  • Opening Data in Sentinel-1 Toolbox — View the Products
  • Visualize a Band
  • Coregister the Data — Coregister the Images
  • Interferogram Formation and Coherence Estimation — Form the Interferogram
  • Visualize Interferometric Phase — TOPS Deburst
  • Multi-looking and Phase Filtering — Phase Filtering

Follow the steps below from the Phase Unwrap an Interferogram data recipe

  • Open your Interferogram in Sentinel-1 Toolbox

Open the wrapped interferogram file. Use the file ending Orb_Stack_ifg_deb_flt.dim.

  • Create a Subset (Optional)

Creating a subset can significantly speed up processing.
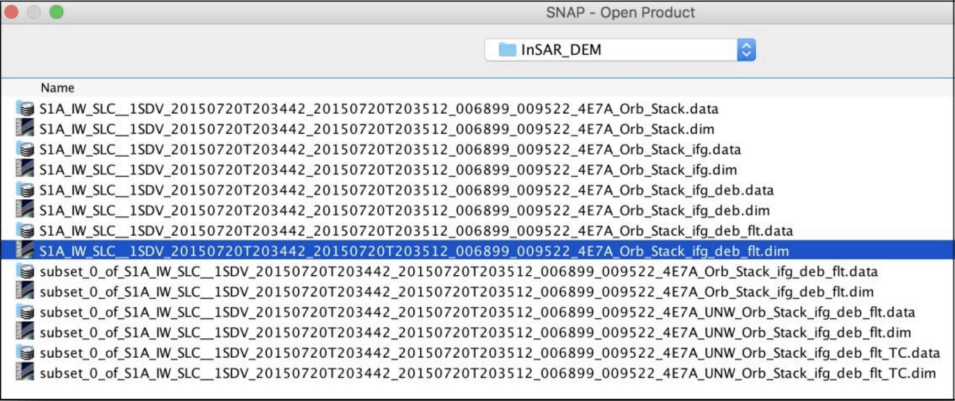
 

Image shows how to open the file ending Orb_Stack_ifg_deb_flt.dim
Image Caption

Open the file ending Orb_Stack_ifg_deb_flt.dim

Export to SNAPHU

Export your interferogram or your subset interferogram from Sentinel-1 Toolbox to SNAPHU.

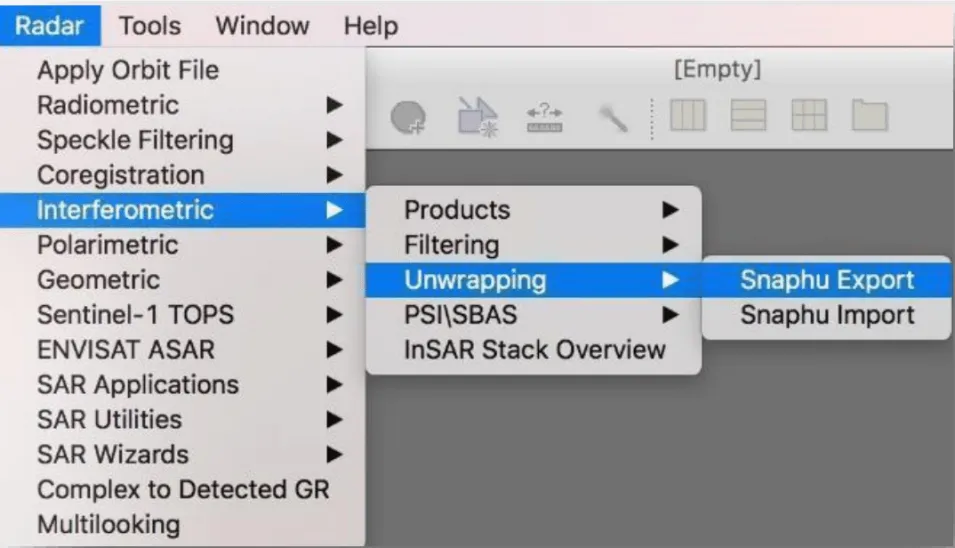
  1. In Sentinel-1 Toolbox, navigate to Radar > Interferometric > Unwrapping > Snaphu Export.

    In the Snaphu Export window:
     
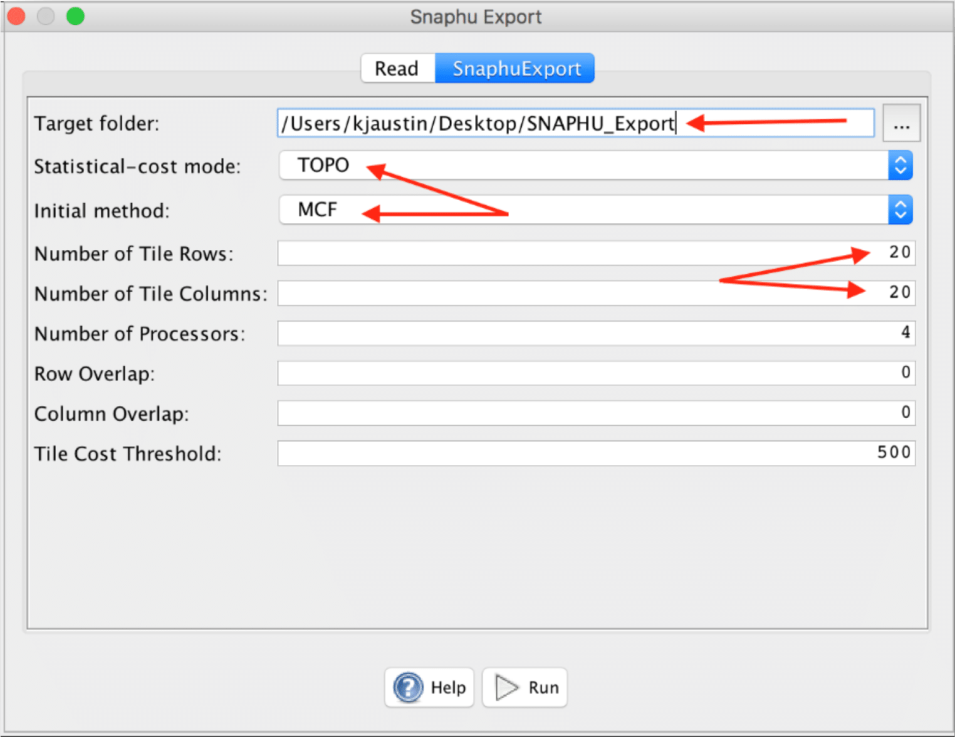
  2. Create a new folder for this step by entering a path and new folder name.
    • Type the folder directory in the Target Folder box.
    • This recipe will call the folder SNAPHU_Export.
  3. Select TOPO mode for DEM generation.
  4. Select MCF.
  5. Change the values of Tile Rows and Tile Columns to 20.
  6. Click Run to create the SNAPHU_Export folder.
    • The folder now holds files used for phase unwrapping.
This image shows how to select Radar In Sentinel-1 Toolbox
Image Caption

In Sentinel-1 Toolbox, select Radar

This image shows how to navigate to Snaphu export.
Image Caption

Navigation to Snaphu export.

This image shows how to enter folder name, TOPO MCF, and change row and column values to 20.
Image Caption

Enter folder name, TOPO MCF, and change row and column values to 20.

Install a Linux VM so you have a place to put the Snaphu Export folder files in step 1 of Unwrap an Interferogram with SNAPHU below.

Zip and move Snaphu Export files to make them accessible to SNAPHU software on Linux.

  • One way is to place files in Google Drive and download them to Linux.
  • Another method is to email them to yourself and retrieve in Linux.

Unwrap an Interferogram with SNAPHU

SNAPHU was developed at Stanford University by Curtis Chen and Howard Zebker.

SNAPHU is Linux only. The user needs to install SNAPHU on the Linux VM.

  1. Install SNAPHU at the Linux command line.
    • At the Linux command line, install SNAPHU:

apt-get install snaphu

This image shows how to install SNAPHU at the Linux command line.
Image Caption

At the Linux command line, install SNAPHU

   2.  Display the SNAPHU config file.

  • Make sure you are in the same directory as the snaphu.conf file.

nano snaphu.conf

This image shows the display of the SNAPHU configuration file at the Linux command line.
Image Caption

At the Linux command line, display the SNAPHU configuration file

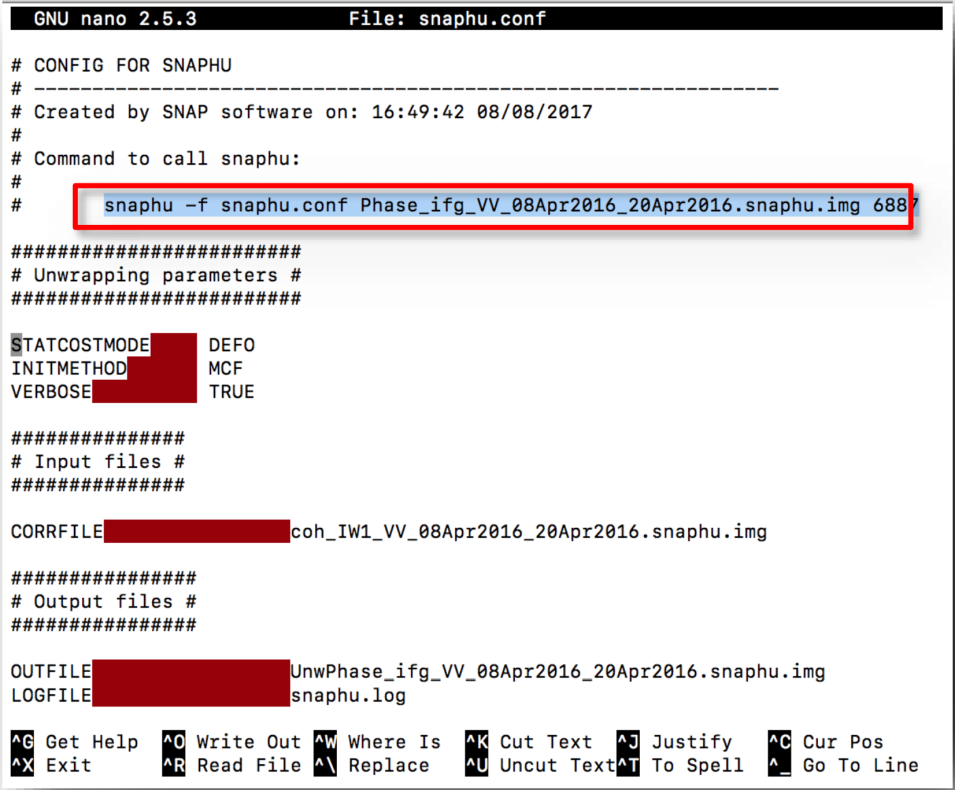
   3.  Copy the command from the config file.

 
This image shows how to copy the command in the red box. Crtl+X to exit the config file.
Image Caption

Copy the command in the red box. Crtl+X to exit the config file.

   4.  Use Ctrl+X to exit the config file.

   5.  Run the command you copied to unwrap your interferogram.

  • In the same directory, paste the command at the Linux command line and Enter.
This image shows how to paste the command and hit Enter
Image Caption

Paste the command and hit Enter

Note: Execution time depends on the size of the interferogram. Unwrapping can use a lot of memory. If the unwrapping fails due to insufficient memory, you may wish to create a subset of your area of interest (See the Create a Subset step of the How to Phase Unwrap an Interferogram data recipe and try again).

   6.  Zip and move the files from the VM to your PC or Mac, so they are accessible to Sentinel-1 Toolbox.

   7.  On your desktop, check your .hdr and .img filenames for a possible mismatch.

  • A bug may cause the filename and contents mismatch between the .hdr and .img files.
  • Mismatched filenames and contents will cause recipe failure.
  • If this happens, see the Defect Warning and Workaround section below.
 

Defect Warning and Workaround

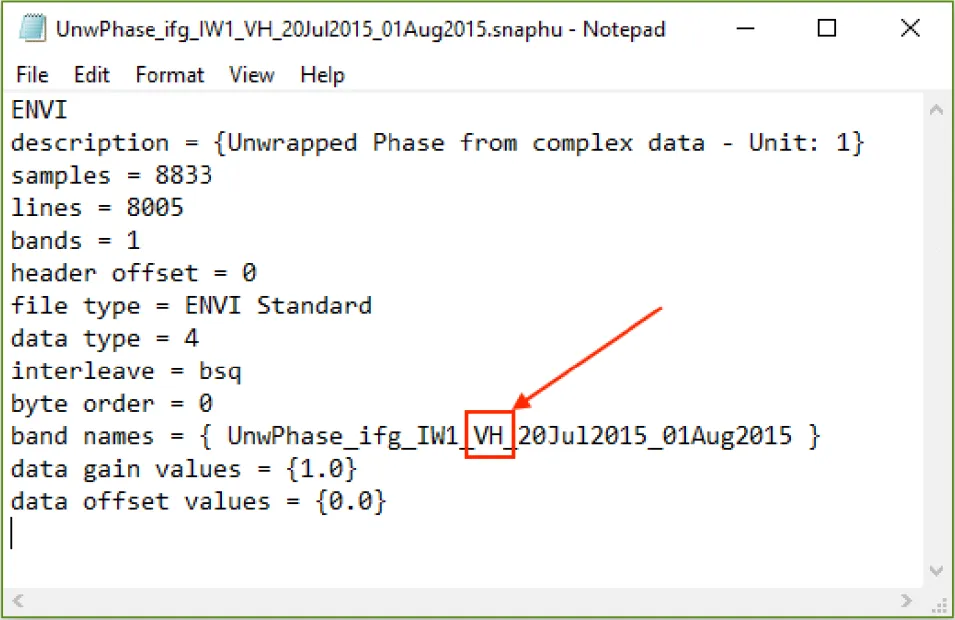
Workaround: If the polarization in the .hdr filename does not match the .img filename, edit the .hdr filename and contents to match the .img filename and contents polarization.

For example:

  • Edit .hdr filename polarization to match the .img filename polarization:
    • UnwPhase_ifg_IW1_VH_20Jul2015_01Aug2015.snaphu.hdr
  • To match .img filename:
    • UnwPhase_ifg_IW1_VV_20Jul2015_01Aug2015.snaphu.img
  • To get this:
    • UnwPhase_ifg_IW1_VV_20Jul2015_01Aug2015.snaphu.hdr
  • Edit the .hdr contents polarization to match the polarization of the .img file.
This image shows how to edit the .hdr file polarization (VH) to match the .img polarization (VV).
Image Caption

Edit the .hdr file polarization (VH) to match the .img polarization (VV).

Open the Files in Sentinel-1 Toolbox

Import your wrapped and unwrapped interferograms into Sentinel-1 Toolbox.

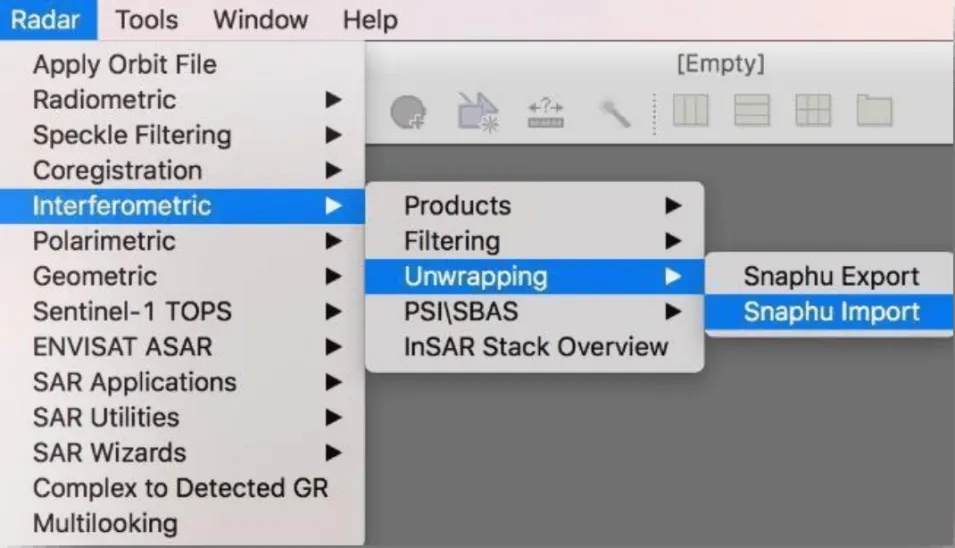
  1. In Sentinel-1 Toolbox, navigate to Radar > Interferometric > Unwrapping > Snaphu Import.
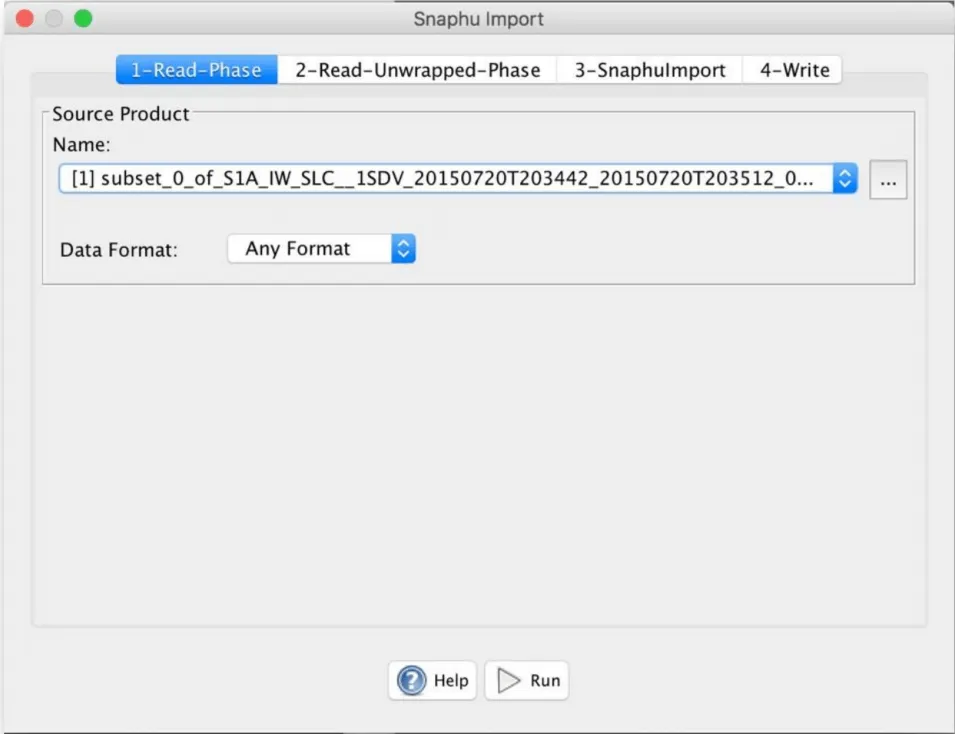
  2. In the 1-Read-Phase tab, select your wrapped interferogram product. This is the same file you exported to SNAPHU. Filename will end in Orb_Stack_ifg_deb_flt.dim. If you subset, it will also start with “subset.”
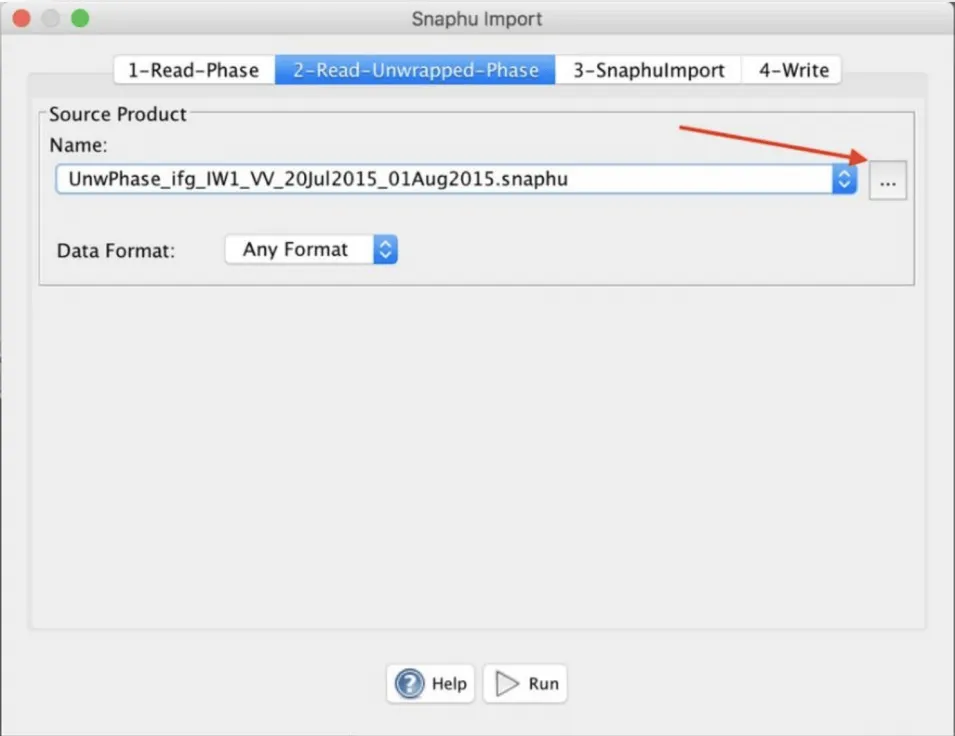
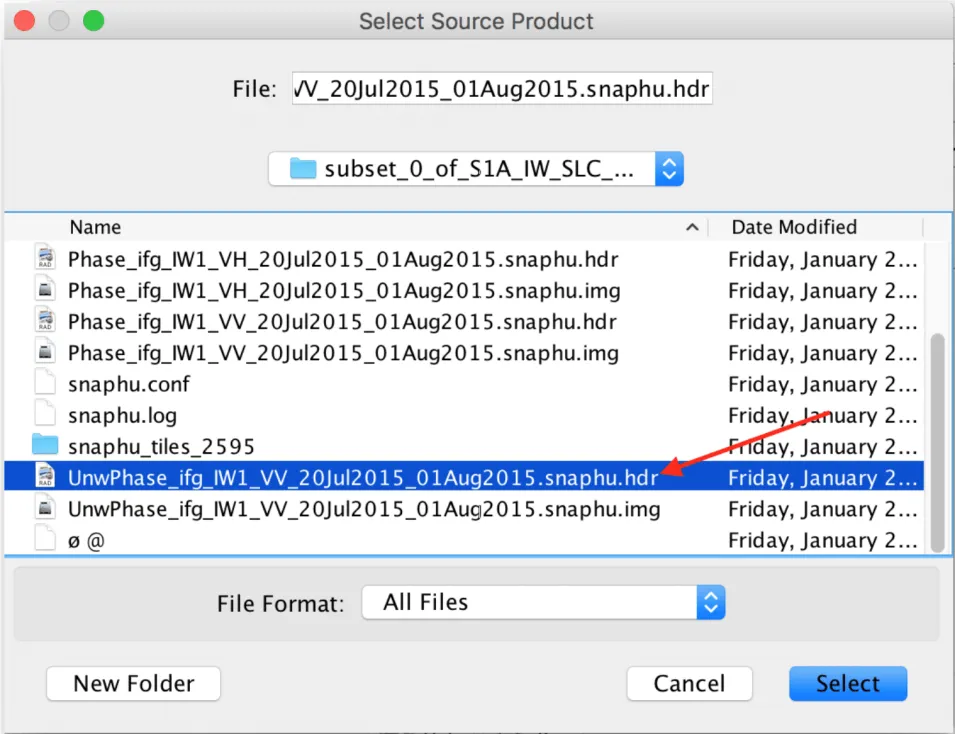
  3. In the 2-Read-Unwrapped Phase tab. Navigate to your Snaphu Export folder and browse to the UnwPhase… hdr file. See Defect Warning and Workaround above in case of error.
This image shows how to navigate to Snaphu Import.
Image Caption

Navigation to Snaphu Import.

This image shows how to browse to your wrapped interferogram and select it.
Image Caption

Browse to your wrapped interferogram and select it. File name will end in Orb_Stack_ifg_deb_flt.dim

This image shows how to browse to your unwrapped .hdr file.
Image Caption

Browse to your unwrapped .hdr file. Note the .hdr extension will not be displayed in this window after selection.

This image shows the selection of the  UnwPhase... hdr file.
Image Caption

Select the UnwPhase... hdr file

In Case of Error Messages

Error messages: “No matching Envi image for the header file.” or “header could not be read.”

This image shows the error message that is shown if filenames or contents are mismatched.
Image Caption

Error message that is shown if filenames or contents are mismatched.

In some cases, .hdr filenames and files contain the incorrect polarization. If this happens, the import will fail because the .img file will not have a matching .hdr file.

Please scroll up to the Defect Warning and Workaround instructions.

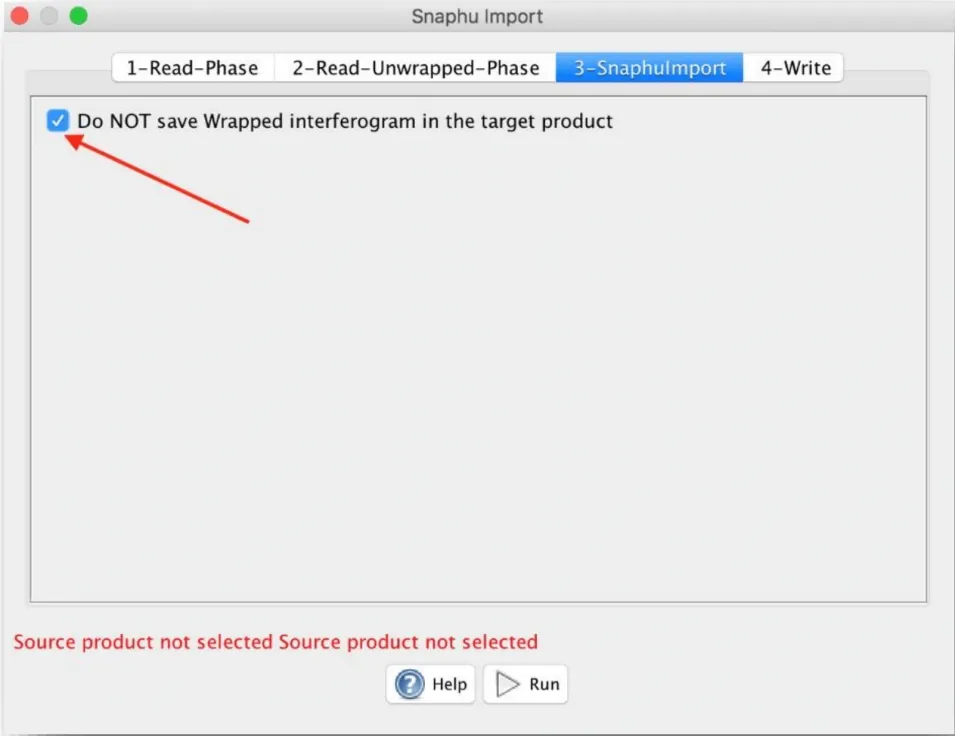
   4.  In the 3-SnaphuImport tab, running Snaphu Import will overwrite your file. To create a new file instead, check the Do NOT save Wrapped Interferogram in the target product option.

This screenshot shows checking the box, "Do NOT save Wrapped Interferogram in the target product".
Image Caption

Check the box.

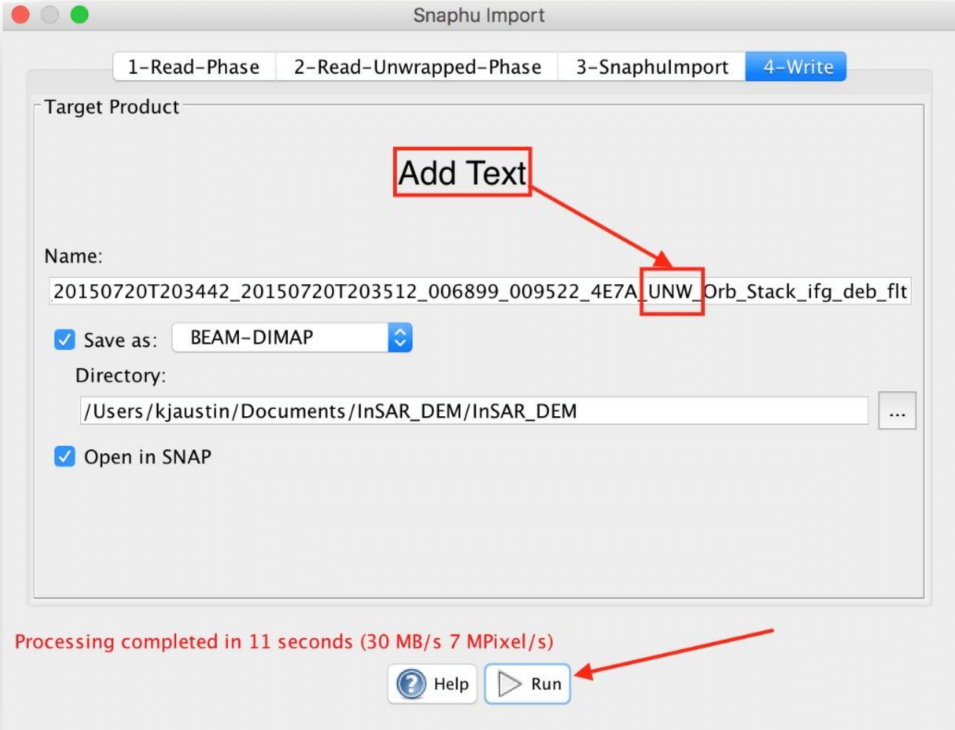
   5.  In the 4-Write tab, values will auto-fill. Edit (add text) to create a unique filename. We added “UNW” to indicate unwrapped. Click Run.

This image shows how to add text to create a unique file name.
Image Caption

Add text to create a unique file name. Click Run.

Create the DEM — Convert Phase to Elevation

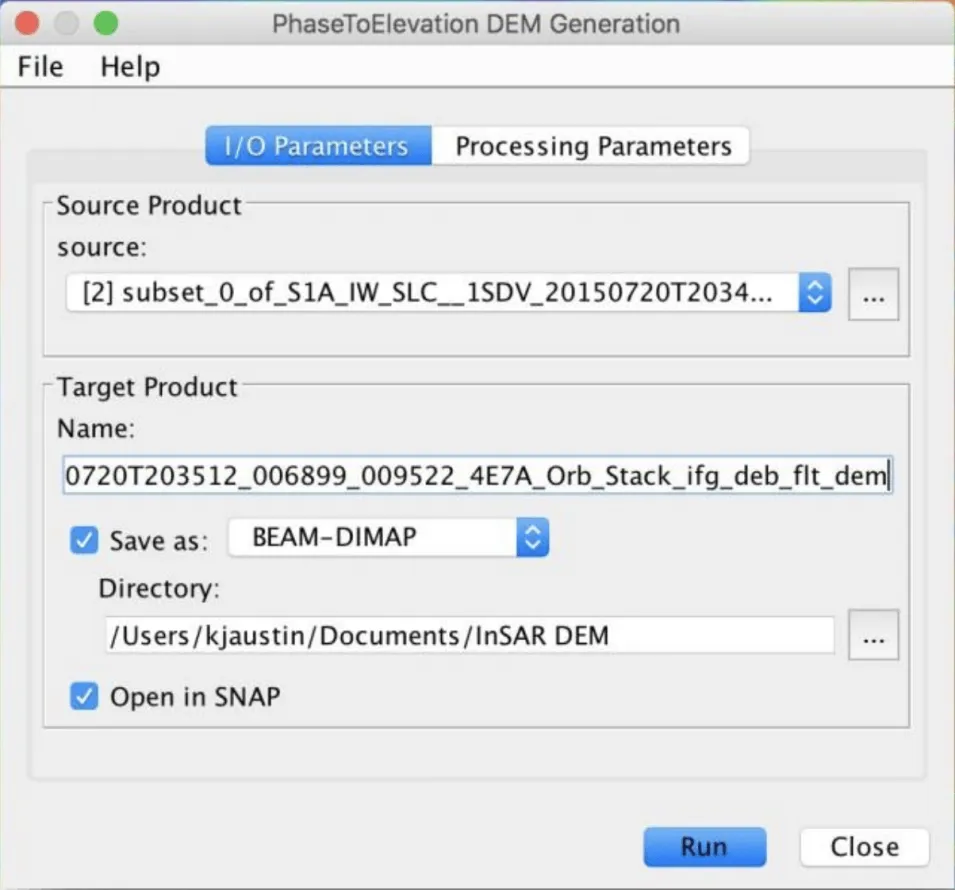
This step converts the interferometric phase to a digital elevation map (DEM).

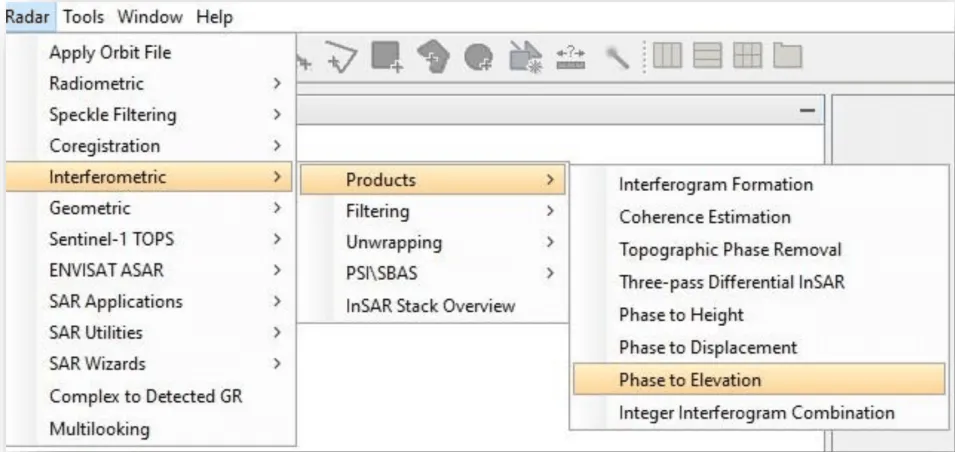
  1. In Sentinel-1 Toolbox, in the Radar tab, select Interferometric > Products > Phase to Elevation.
  2. Enter the unwrapped interferometric product filename in Source Product, source:
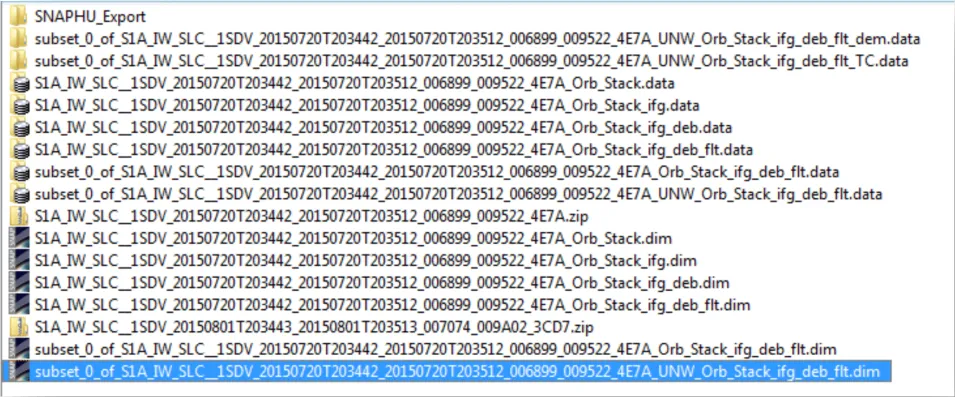
    • Use the file you added the “UNW” text to in Open the Files from Sentinel-1 Toolbox — Step 5.
    • The Target Product Name, your DEM final product, will automatically populate.
    • Edit the Directory the product will appear in, if desired.
  3. Click Run.
  4. You now have a DEM file called yoursourcefilename_dem.
This image shows how to select Radar In Sentinel-1 Toolbox
Image Caption

In Sentinel-1 Toolbox, select Radar

This image shows selection of Phase to Elevation
Image Caption

Select Phase to Elevation

This image shows how to select the file you added "UNW" to your unwrapped interferogram.
Image Caption

Select the file you added "UNW" to your unwrapped interferogram.

This image shows ho to create a DEM by clicking Run.
Image Caption

Click Run to create a DEM

Geocode the DEM

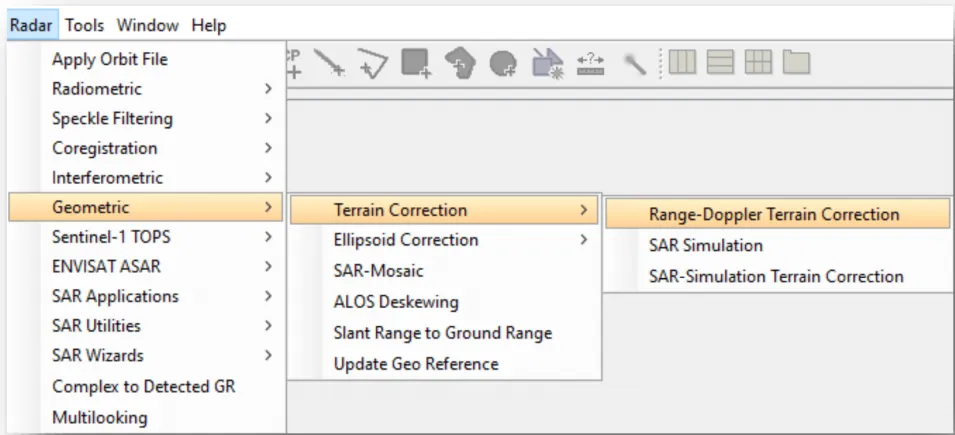
  1. From the Radar menu, select Geometric > Terrain Correction > Range Doppler Terrain Correction. 

    Note: This correction method uses available orbit state vector information in the metadata, the radar timing annotations, the slant to ground range conversion parameters together with the reference DEM data to derive the precise geolocation information.
     
  2. Without changing any values, click Run.
This image shows how to select Radar In Sentinel-1 Toolbox
Image Caption

In Sentinel-1 Toolbox, select Radar

This image shows how to navigate to the Range-Doppler Terrain Correction.
Image Caption

Navigation to Range-Doppler Terrain Correction.

This image shows
Image Caption

Click Run.

The DEM Product

  1. Double-click the resulting _TC product.
  2. Double-click on Bands.
  3. Then double-click on the Unw_Phase_ifg_20Jul2015_01Aug2015_VH file.

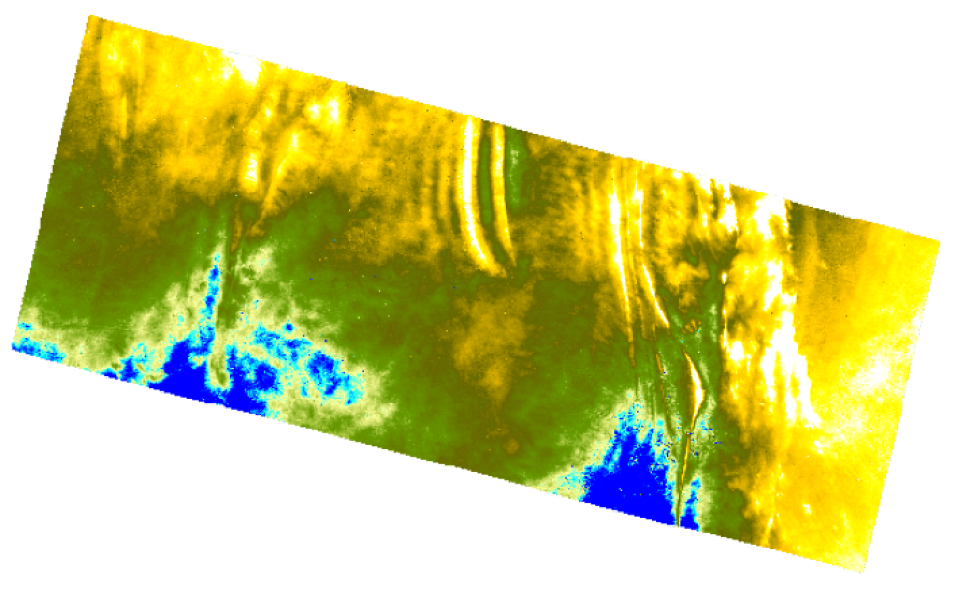
The image of your DEM will appear. 

You now have a geocoded terrain-corrected DEM called yousourcefilename_TC.

Image of a complete geocoded terrain-corrected Sentinel-1 DEM. Credit: Contains modified Copernicus Sentinel data 2015, processed by ESA.
Image Caption

A complete geocoded terrain-corrected Sentinel-1 DEM. Credit: Contains modified Copernicus Sentinel data 2015, processed by ESA.

Details

Last Updated

Published on

Data Centers

Alaska Satellite Facility DAAC (ASF DAAC)